Back to menu
Video captures
If you want to show how to resolve a
difficult part in a game or your ability to
make a high score in a hard game, then this
feature is for you as it allows to create
first an enhanced version of a save state
with saving of all your inputs in the game,
then eventually in a second step to create an
AVI file with choice between different codecs.
The general procedure is as following :
- start the video capture
- stop the video capture (it will create the
.cap file in the subdirectory Video Capture)
- load a cap file OR play last capture
- select "render video file"
- give a name to the .avi file
- select a correct compressor (it's different
following the PC, some compressors will work,
others will not work - easy option is to
select "Microsoft Video 1")
- wait for the end of the operation (you can
follow the progression in %)
- click on the AVI file
Attention ! blueMSX saves the
complete CPU state, including the emulated
machine with all his specifications and
the path to the rom, dsk or cas file of your
game.
So don't try later to load a video
capture in another machine and don't change
the place of your games on the harddisk ! It's
also recommended to put your games in a
directory with a simple path (for example : C:\MSX\Roms)
before your first video capture if you have
the intention to share them with other fans.
If you use cheats, the parameters of
the cheats are not saved. So it
means that if you load later a video capture,
you need to re-apply exactly the same cheats
on the game after loading of the video
capture. The AVI files will always be
created without the cheats, so the
result can be very different !
You can use the options of the File / Video
Capture menu or access to them directly by
the default shortcuts as indicated below.
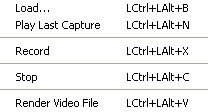
Load...
Allows to load and play a video capture of
your choice
Play Last Capture
Allows to play the last recorded video
capture.
Record
Allows to record a new video capture or to
append a sequel to a loaded and played video
capture ; in this last case, the menu item
becomes "Record (append)".
A unique file name is always created, by
using this system : the name of the game or
demo, followed by "_" , a number of
2 digits (the first combination is "00")
and the extension .cap. This file will be
stored in the Video Capture directory.
Stop.
Alllows to stop the recording of a video
capture.
Note : use F9 to
stop the playing of a video capture
Render Video File
Allows to convert the video capture into an
AVI file.
After indication of the name of the AVI file,
you need to select a codec for the
compression.
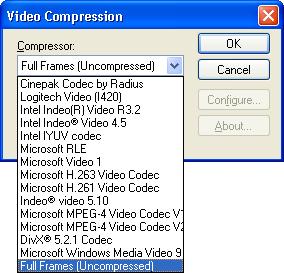
The choice of a codec depends from the
requested quality, but also from the using
you'll make with the video capture. Some
codecs are configurable, what's also
important.
If you want to share your AVI files with
other fans, than it's better to create AVI
files that can be read by the Windows Media
Player; in this case, use the Microsoft Video
1 codec.
By default, the video rendering will use 60
frames per second and a 640x480 resolution.
You can eventually change the corresponding
parameters in the blueMSX.ini file :
video.captureFps=60
video.captureSize=1
The first one can be set to anything, but the
two values coherent with the VDP frequency of
the emulated machine are 50 and 60.
60 is better to use whenever possible because
it's what the frame mixing routines are
optimized for.
The second can be set to 0 and 1. 0 means 320x240
resolution; 1 means 640x480 resolution.
Questions and
answers
How to use a video capture as a
save state ?
Simply rename the .cap
file with the extension .sta ! Then
check this page
of the manual !
How to know the exact content of
a video capture ?
If you are very curious about
the exact content of a blueMSX video capture,
simply rename the .cap file with the
extension .zip and unzip the file !
Apart from an additionnal file (capture_00),
the content is exactly the same as for a save
state ! So check this
page of the manual !
Back to menu